Unlock Endless Sweetness: Why Homemade Simple Syrup is Your New Kitchen Essential
Are you tired of shelling out for pricey, store-bought simple syrup that often contains unnecessary additives? Do you find your cold drinks, from iced coffee to craft cocktails, lacking that perfectly balanced sweetness? It’s time to discover the magic of making your own simple syrup at home. This often-overlooked liquid sweetener is not only incredibly easy and affordable to prepare, but a batch can also last for up to a month in your refrigerator, ready to elevate almost any beverage or dessert. Forget the grocery store aisle – once you learn how to make simple syrup, you'll wonder why you ever bought it.
Simple syrup is a foundational ingredient in mixology and a secret weapon for home bakers and beverage enthusiasts. Its liquid form ensures that sugar dissolves seamlessly into cold liquids, preventing the grainy texture often associated with adding granulated sugar directly. This article will guide you through everything you need to know, from basic ratios to creative infusions, ensuring you master this versatile kitchen staple.
What Exactly Is Simple Syrup and Why Is It So Indispensable?
At its core, simple syrup is exactly what its name suggests: a simple blend of sugar and water, heated until the sugar completely dissolves. This creates a clear, viscous liquid that is far more effective at sweetening cold drinks than granulated sugar alone. Think about trying to stir sugar into an iced tea – often, it just settles at the bottom. Simple syrup eliminates this frustration, offering instant, uniform sweetness.
While often associated with high-end cocktail bars, simple syrup's utility extends far beyond. It’s the unsung hero behind perfectly balanced iced coffees, refreshing lemonades, and elegant mocktails. Bakers also embrace it for moistening cakes, creating glazes, and even sweetening sorbets. It's an ingredient that empowers you to control the sweetness and flavor profile of countless culinary creations, offering a level of customization that store-bought versions simply can't match.
The Smart Choice: Why DIY Simple Syrup Trumps Store-Bought
Opting for homemade simple syrup offers a multitude of benefits:
- Cost-Effective: Sugar and water are incredibly inexpensive. Making your own batch costs mere pennies compared to pre-made bottles.
- Pure Ingredients: You control what goes into it. No preservatives, artificial flavors, or mysterious ingredients – just pure sweetness.
- Freshness: A homemade batch is always fresher, ensuring the best flavor for your drinks and dishes.
- Customization: This is where the real fun begins! Once you master the basic recipe, the possibilities for infusing your syrup with herbs, fruits, or spices are endless, opening up a world of unique flavor profiles.
- Convenience: Having a bottle in your fridge means instant access to a liquid sweetener whenever inspiration strikes, whether it's for an impromptu cocktail or a quick iced coffee.
Mastering the Ratios: 1:1 vs. 2:1 Simple Syrup
The foundation of any simple syrup is its ratio of sugar to water. While the concept is straightforward, understanding the two primary ratios will help you tailor your syrup to specific needs and preferences. To truly Unlock Perfect Sweetness: Make 1:1 or 2:1 Simple Syrup at Home for all your beverage needs, understanding these proportions is key.
Traditional Simple Syrup (1:1 Ratio)
This is the most common and versatile type of simple syrup. It calls for equal parts sugar and water. For example, 1 cup of sugar to 1 cup of water. The resulting syrup is fluid, easy to pour, and provides a balanced sweetness without being overly thick. It's perfect for:
- Most cocktails (e.g., Mojitos, Daiquiris, Whiskey Sours)
- Sweetening iced teas, iced coffees, and lemonades
- Light glazes for pastries
Rich Simple Syrup (2:1 Ratio)
As the name suggests, rich simple syrup uses two parts sugar to one part water (e.g., 2 cups of sugar to 1 cup of water). This higher sugar concentration results in a thicker, more viscous syrup that offers a more intense sweetness with less volume. Many professional bartenders prefer rich simple syrup because:
- It adds a luxurious body and mouthfeel to cocktails.
- Less is needed to achieve the desired sweetness, meaning less dilution of the other ingredients in a drink.
- It can extend the shelf life slightly due to the higher sugar content acting as a preservative.
While often made with granulated sugar, rich simple syrup can also be crafted with demerara sugar for a deeper, caramelized flavor, excellent in whiskey-based cocktails.
How to Make Simple Syrup: Your Step-by-Step Guide to Homemade Perfection
Ready to get started? Making simple syrup is incredibly easy and takes just a few minutes of active time. For a comprehensive guide to mastering this versatile ingredient, check out our article on Master Simple Syrup: Easy Homemade Recipe for Cocktails & More.
Ingredients You'll Need:
- Granulated Sugar (or demerara for a richer flavor)
- Water
Equipment:
- Small saucepan
- Whisk or spoon
- Measuring cups (dry for sugar, liquid for water) or a kitchen scale for precision
- Heat-proof, airtight container for storage (e.g., glass bottle, Mason jar)
The Process:
- Measure Your Ingredients: Decide on your desired ratio (1:1 for traditional, 2:1 for rich) and measure out your sugar and water. While measuring cups are perfectly adequate for home use (e.g., 1 cup sugar with a dry measure, 1 cup water with a liquid measure), for ultra-precise results, weigh your ingredients (e.g., 8 ounces of sugar to 8 ounces of water for 1:1).
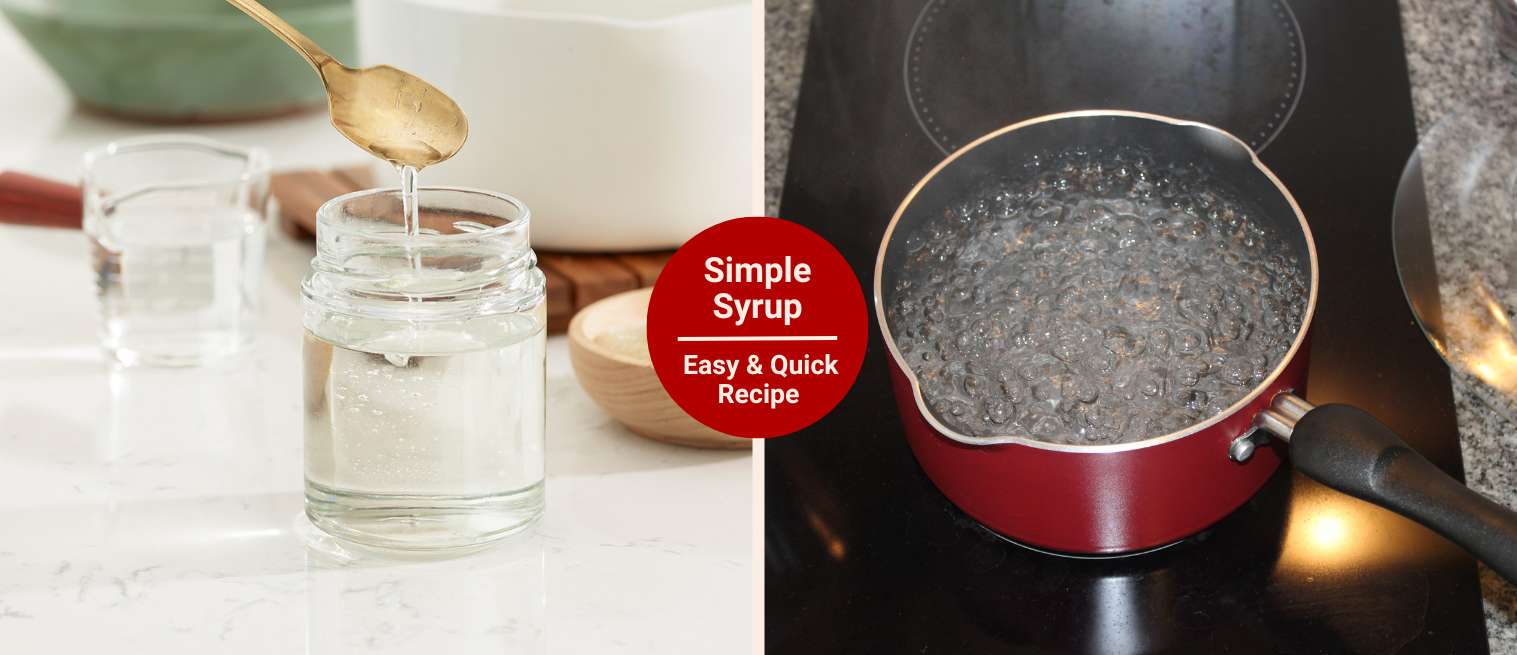
- Combine in a Saucepan: Add your measured sugar and water to a small saucepan. Give it a quick stir to combine the ingredients slightly.
- Gently Heat and Dissolve: Place the saucepan over medium heat. Stir continuously or frequently until all the sugar crystals have completely dissolved into the water. You should have a clear liquid with no visible granules. Important: You do not need to bring the mixture to a boil. Simmering is fine, but vigorous boiling can cause some of the water to evaporate, potentially altering your ratio slightly and making the syrup too thick.
- Remove from Heat and Cool Completely: Once the sugar is fully dissolved, remove the saucepan from the heat immediately. Allow the simple syrup to cool completely to room temperature. This step is crucial for preventing condensation and ensuring proper storage and longevity.
- Store Your Homemade Syrup: Once your simple syrup is entirely cool, transfer it to a clean, tightly sealed glass container. A Mason jar, swing-top bottle, or even a repurposed syrup bottle works perfectly. Store it in the refrigerator.
Storing Your Golden Elixir: Longevity and Best Practices
One of the greatest advantages of making your own simple syrup is its impressive shelf life. Stored correctly, your homemade simple syrup can last for up to 1 month in the refrigerator. For rich simple syrup (2:1), the higher sugar concentration can sometimes extend this even further.
Tips for Optimal Storage:
- Airtight Containers: Always use a container with a tight seal. This prevents air exposure, which can lead to bacterial growth and spoilage.
- Glass is Best: Glass containers are ideal as they don't absorb odors or colors and are easy to sterilize.
- Refrigerate Promptly: Once completely cooled, get your syrup into the fridge as soon as possible.
- Check for Spoilage: Before each use, quickly check your syrup. Signs of spoilage include cloudiness, off-odors, mold, or fermentation (small bubbles appearing on the surface). If you notice any of these, it’s best to discard the batch and make a fresh one.
Unleash the Versatility: Creative Uses for Simple Syrup
Now that you know how to make simple syrup, it’s time to put it to good use! Its applications are vast and varied:
- Cocktails & Mocktails: This is its most famous role! Use it to sweeten classics like Mojitos, Margaritas, Daiquiris, Old Fashioneds, or a refreshing Gin Fizz. For mocktails, it's perfect in a sparkling berry cooler or a virgin mojito.
- Coffee & Tea: Say goodbye to gritty sugar in your iced lattes, cold brews, or iced teas. A drizzle of simple syrup blends seamlessly.
- Lemonades & Juices: Create perfectly balanced homemade lemonade, limeade, or fruit punches.
- Baking:
- Cake Moistener: Brush simple syrup between cake layers or over the top of a slightly dry cake to add moisture and flavor.
- Glazes & Frostings: Incorporate into glazes for fruit tarts or as a base for buttercreams.
- Baklava: It's a key ingredient, often infused with rose or orange blossom water, providing that signature sticky, sweet finish.
- Desserts:
- Fruit Salads: Drizzle over fresh fruit salad to enhance natural sweetness and add a subtle sheen.
- Ice Cream & Sorbet: Use it as a base for homemade sorbet or to sweeten plain yogurt or ice cream.
- Pancakes/Waffles: A unique alternative to maple syrup, especially if infused.
- Marinades & Dressings: A touch of simple syrup can balance acidic vinaigrettes or tenderize meats in marinades.
Beyond the Basics: Infusing Your Homemade Syrup
Once you’ve mastered the basic recipe, elevate your simple syrup by infusing it with extra flavor. This is incredibly easy to do:
- After removing the dissolved sugar mixture from the heat, add your desired aromatics to the hot syrup.
- Let it steep as the syrup cools to room temperature.
- Strain out the solids before storing.
Some popular infusion ideas:
- Herbs: Mint, rosemary, basil, thyme, lavender.
- Fruits: Citrus peels (lemon, orange, lime), berries (muddled or sliced), ginger slices, peaches.
- Spices: Cinnamon sticks, star anise, vanilla bean, cardamom pods.
- Florals: Rose petals, hibiscus (ensure they are food-grade).
Conclusion: Your Journey to Perfect Sweetness Starts Now
Making simple syrup is one of the easiest and most rewarding kitchen skills you can learn. With just two ingredients and minimal effort, you gain access to a versatile liquid sweetener that will transform your drinks, desserts, and even savory dishes. By choosing homemade, you're not only saving money but also ensuring pure, fresh ingredients and opening the door to endless flavor possibilities through infusions. So, skip the store-bought bottles, embrace the DIY spirit, and start your journey to perfectly balanced sweetness today. Your taste buds (and your wallet) will thank you!
